AWE Grid design
| E-mail: z.zhao@rug.nl |
Introduction
This document describes how Astro-WISE and Grid are integrated with each other from a technical point of view. It is meant to give developers an overview of all the processes involved in the integration.
Astro-WISE [1] stands for Astronomical Wide-field Imaging System for Europe. It has been developed to scientifically exploit the data produced by science experiments. The idea behind Astro-WISE is to keep the data model, data and data processing in the same system. The Astro-WISE system is written in Python, which allows programs written in other programming languages to be wrapped into a Python module, library or class.
The Astro-WISE system :raw-latex:`\cite{begeman-merging}` consists of the following elements: dataservers, metadata database, Astro-WISE programming environment, distributed processing unit (DPU), computing nodes, and a concurrent versioning system. In Astro-WISE, data servers are used to store all data files created by users. A metadata database is used to store a full description of each data file with links and references to other objects. The DPU is responsible for sending jobs to computing clusters, monitoring the status, and retrieving results.
The well known EGEE project [2] :raw-latex:`\cite{jones2005overview}` is currently operating a worldwide Grid infrastructure consisting of more than 250 sites in more than 50 countries. The main goal of the project is to provide researchers with access to a production level Grid infrastructure.
The EGEE Grid is built on the gLite middleware stack :raw-latex:`\cite{laure2006programming}`, which provides a number of services, including information and monitoring services, workload management services, and data management services.
The information and monitoring services provide a mechanism to publish and consume information and to use it for monitoring purposes.
The workload management services include computing elements (CE) and workload management system (WMS). The CE provides the virtualization of a computing resource, which provides information about the underlying resource and offers a common interface to submit and manage jobs on the resource. The WMS is a Grid level metascheduler that schedules jobs on the available CEs according to user preferences and several policies.
Storage elements (SE) is one of the main serivices provided by the data management services. The SE provides the virtualization of a storage resource much like the CE abstracts computational resources.
gLite supports three types of storage systems, they are d-cache, DPM, and StoRM, respectively. All three types of storage systems support the Storage Resource Management (SRM) interface, which is described in detail in Appendix C.
The main components involved in the integration of the two architectures Astro-WISE and Grid are shown in Figure Components of Astro-WISE and Grid. The counterpart of the Astro-WISE DPU in the Grid environment is the workload management system, as the WMS is responsible for the distribution and management of tasks across Grid resources.
The integration of Astro-WISE and the Grid needs to be considered from three technical aspects: the authentication of users, job submission to the Grid via Astro-WISE, and the use of Grid storage.
Section Architectural Overview gives a detailed description of the design of the integration from each of these aspects. Implementation details of the integration are described in Section Implementation Details. Section Lofar as an Example shows how Lofar as one of the users of the integrated system can use it.
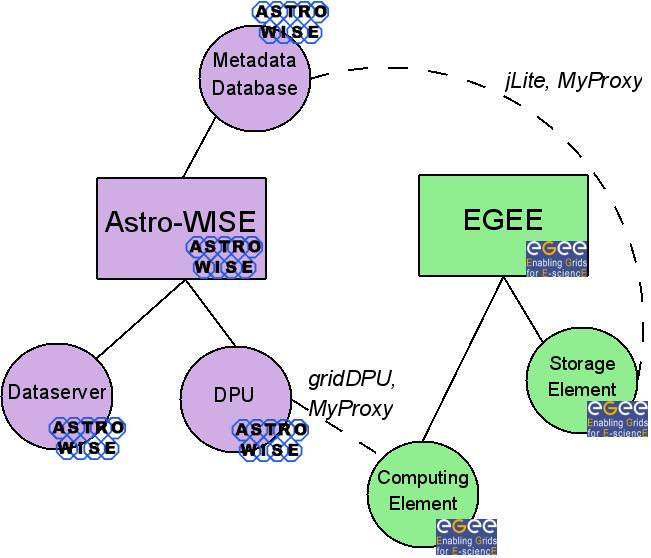
Components of Astro-WISE and Grid
Architectural Overview
User authentication
In Astro-WISE, user authentication is achieved using username and password. Given the username and password, users are able to access the database, start processing (pipelines), and store and retrieve files to/from Astro-WISE storage.
In Grid environments, X.509 certificates are used for authentication and authorization :raw-latex:`\cite{lock-grid}`. In order to use the Grid resources, users need to have a valid Grid certificate which is supplied by a Certification Authority (CA). VOMS :raw-latex:`\cite{alfieri2005gridmap}`, which stands for Virtual Organisation Management Service, is used to provide the information about VO membership needed to Grid resources.
Given a Grid certificate, a VOMS proxy can be generated which contains information about to which virtual organisation (VO), group or role a user belongs to. The generated VOMS proxy can then be used to perform computing on the grid or access to grid storage.
Since the user authentication process in Grid environment is relatively complicated, we refer to the proxy diagram and its description (see Appendix A) to give an overview of the different systems involved and how a proxy flows through these systems.
The integration of the Grid and Astro-WISE authentication mechnism can be described from two perspectives: computing on the Grid and using Grid Storage. To realise the integration, we use third-party tools such as MyProxy Upload Tool [3] and jLite [4].
The MyProxy Upload Tool is developed by the UK National Grid Service [5] (NGS). It can be used to upload a user’s proxy to a MyProxy Server using username and password. The uploaded proxy can then be retrieved by other applications provided the corresponding username and password. The tool is a Java webstart application, which allows users to start the application directly from the internet using a web browser.
Although a Java webstart application is handy to use, a command-line tool is also useful when a use only wants to use the awe prompt. Therefore, a command-line version of MyProxy Upload has been developed, which is added into the Astro-WISE distribution. By doing this, a user can upload a proxy directly from the awe prompt.
The uploaded proxy is by default valid for 2 weeks, therefore, the same action needs to be performed every two weeks. After a proxy is uploaded to the MyProxy Server, users can submit jobs to the Grid via the grid DPU (see subsection Job submission).
As mentioned before, Astro-WISE makes use of username and password for user authentication. In order to integrate it with the Grid authentication mechanism, we use the Astro-WISE username and password for uploading user’s proxy to the MyProxy Server.
After a job is submitted, the DPU will check whether the required destination to run the job is the Grid. If so, the DPU will retrieve a short-term proxy from the MyProxy Server using the Astro-WISE username and password, generate a voms-proxy using the retrieved proxy, and submit the job to the Grid.
jLite is a Java library providing simple API for accessing gLite based grid infrastructure. It includes a tool for generating VOMS proxies, which can be used on user’s computer where no gLite middleware is available. We use this functionality of jLite to generate VOMS proxy using a user’s long-term certificate, and checks whether a user’s proxy is still valid when an access to the Grid storage is requested. This tool has been integrated in the Astro-WISE environment. The actual access to the Grid storage is done by using the dCache SRM client.
Job submission
In Astro-WISE, the DPU is responsible for job submission. It is capable of sending jobs to parallel clusters or single machines :raw-latex:`\cite{begeman-merging}`. The system may run on openpbs or under its own queue management software.
The EGEE gLite middleware [6] is the de-facto standard for grid job submission on all EGEE-related grids and clusters. The Workload Management System (WMS) [7], which comes with the gLite middleware, is used for submitting jobs onto the grid. The Linux shell commands to submit jobs are described in detail in Appendix B.
To submit jobs to the Grid via Astro-WISE, three conditions need to be
satisfied. First of all, the commands for job submission to the Grid
must be managed by the DPU. Second, a JDL file (see Appendix B) must be
generated by the DPU. Third, the gLite middleware needs to be present.
In order to meet these requirements, a so-called grid DPU has been
installed on a grid UI machine, where the gLite middleware is available.
The implementation of the DPU is also modified to be able to handle
commands related to grid job submission, such as
glite-voms-proxy-init, glite-wms-job-submit, etc.
Job submission in Astro-WISE
Storage
In Astro-WISE, the DataObject class represents objects that have an
associated data file, i.e. every instance of class DataObject or
every class which is derived from class DataObject has an associated
data file. These data files are stored on dataservers, where each file
has a unique name. The unique filename is stored in the database as part
of the metadata. The DataObject Class has store and retrieve methods
which can store and retrieve a file to/from the dataserver given the
unique name. The HTTP protocol is used in this case.
To handle data in Astro-WISE, knowledge about the protocol and location
of the data is a must. Both the protocol and location can be defined in
a URI, Uniform Resource Identifier. An URI is of the form
protocol://server/path/file. Given an URI, the DataObject
class can take the appropriate actions for storing and retrieving the
file, given the protocol. The URI must be stored in the database.
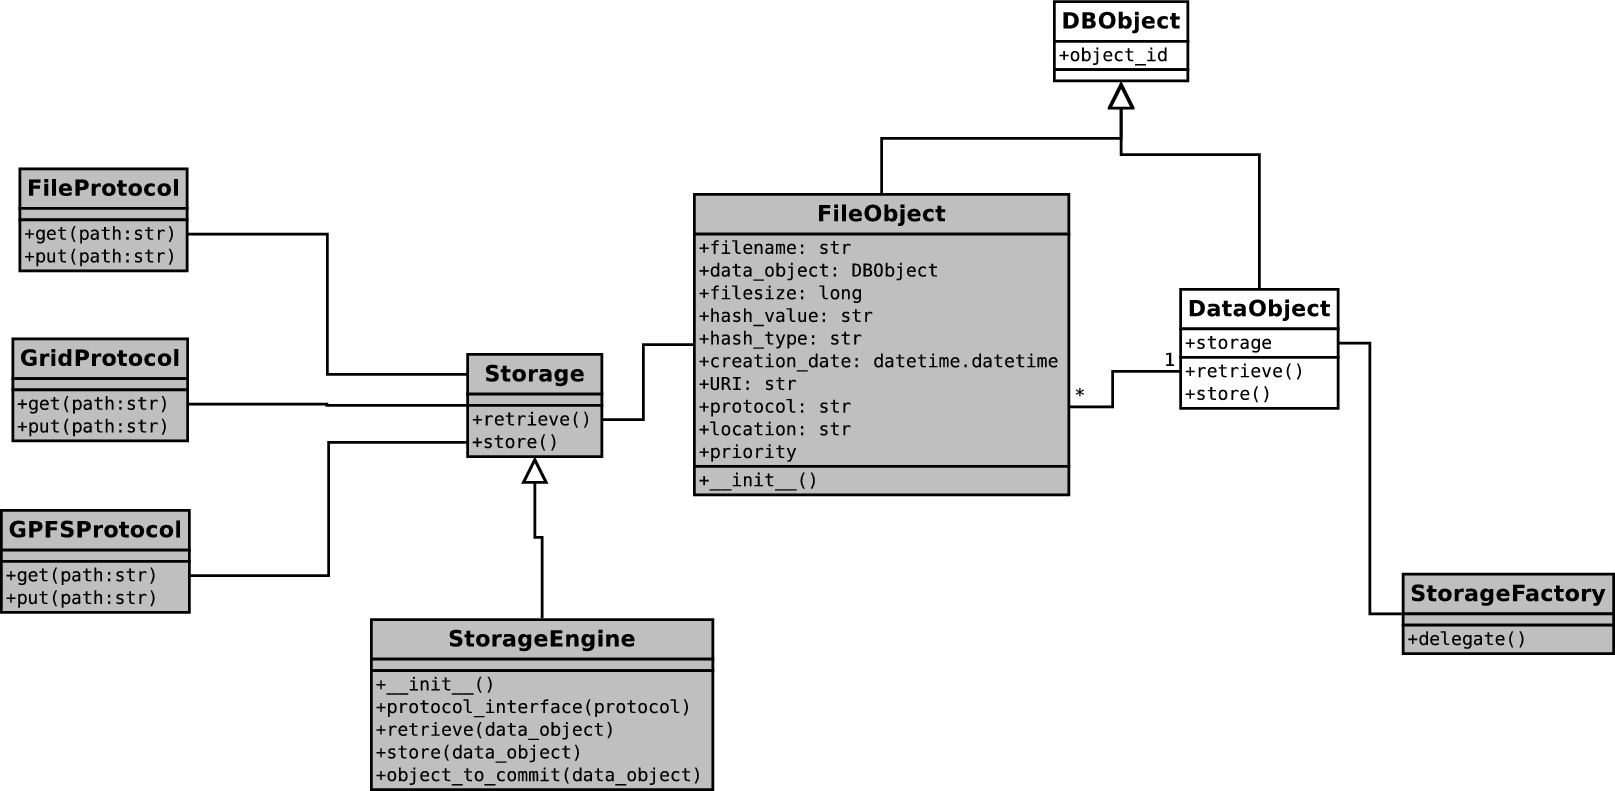
Class diagram of Astro-WISE with support of different types of storage
Our solution is to use a seperate storage table to store the URI of a file, which gives the following advantages:
- The Storage table can have multiple entries for the same object, therefore we can administrate multiple copies (replicas) of a file
- The privileges of the Storage table can be different from the privileges of the rest of the metadata, which adds an extra security layer to the system. For example, everyone can see the metadata of files, but only privileged users can see the URI.
- The framework can easily be extended to support other storage systems by adding the corresponding interface.
To implement this, a new class FileObject has been created which
represents the files associated with a DataObject. This class is the
storage table we refer to. In the storage table, a FileObject
contains information of a file, such as filesize, creation date, hash
value, and URI, etc. It also has a reference to the DataObject
to which it is associated.
The DataObject class has been modified to be able to choose between
different storage engines, for example, astro-wise and lofar.
This is done by adding a class attribute Storage. If astro-wise
is selected, the DataObject class will use the original Astro-WISE
storage method, i.e. store and retrieve files to/from dataservers using
the unique filename. If lofar is selected, the DataObject class
will use the LTAStorage (Lofar Long-term Archive Storage) class.
Different storage interfaces have been implemented, for example, DataserverProtocol and GridProtocol. These interfaces provide the actual access to the storage using the corresponding protocol.
The GridProtocol interface has been implemented with the help of ldapsearch and the dCache SRM client. ldapsearch is used to retrieve information, such as Storage Element and SAPath from the Grid information system BDII, while dCache SRM client is used to perform the actual store and retrieve actions.
Implementation Details
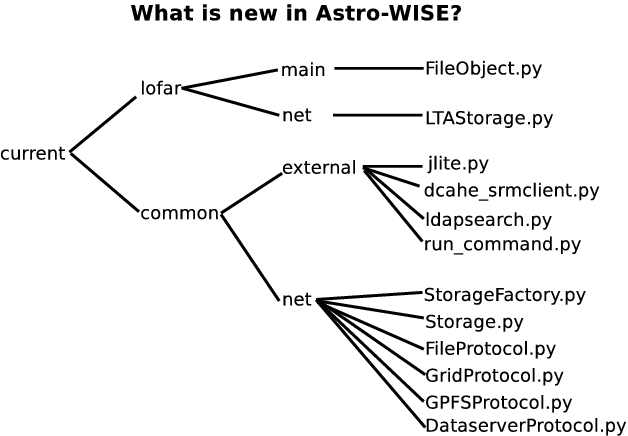
New classes in Astro-WISE
class FileObject
- Location:
lofar/main/FileObject.py
The FileObject class has a few attributes which describes the
information of files that are assoacited to a certain DataObject.
These attributes are:
filename- The name of the associated file
data_object- The associated data object
file_size- Size of the file
hash_value- Hash value of the content of the file
hash_type- Hash type used for hash value
creation_date- Date this object was created
URI- The uri the file can be retrieved from
protocol- The protocol used to store and retrieve the file
The FileObject class provides the following functionalities:
Check the number of copies of a file associated to a DataObject.
Return a list of file objects given a filename. Make a FileObject.
Protocol interfaces
class FileProtocol
- Location:
common/net/FileProtocol.py
The FileProtocol class handels the retrieve and store of files on
the local computer. It has two methods: get() and put(), which
check whether a file exists.
class DataserverProtocol
- Location:
common/net/DataserverProtocol.py
The DataserverProtocol class handels the retrieve and store of files
on local and remote dataservers. When DataserverProtocol is
instantiated, it is initialized with a dataserver name and a port
number. The DataserverProtocol class has two methods: get() and
put(). These two methods call the corresponding get() and
put() methods implemented by Data_IO.
class GridProtocol
- Location:
common/net/GridProtocol.py- Related_to:
- jlite.py, dcache_srmclient.py, and ldapsearch.py
The GridProtocol class is the interface to Grid storage. It
generates a user proxy, and stores and retrieves files to/from the Grid.
The GridProtocol class has:
- A constructor which initializes an instance with a default destination where files will be stored. This is done by calling method
set_default_destination(). Two methods:
get()andput().These two methods perform the actual store and retrieve tasks. They use theinit_proxy()method to make sure that before connecting to the Grid, a valid user proxy exists. Theinit_proxy()method checks whether there is a valid proxy, if not, it will generate a proxy by calling theproxy_init()function in jlite.py. Theput()method also calls methodcheck_directory(), which checks whether the destination directory exists.A
check_hash()method. It checks whether the hash value and filesize of a local file and a remote file are the same. The hash value of the local file is generated by calling methodgenerate_hash_value(). The information of the remote file is obtained by calling functionsrmls_parser()in file dcache_srmclient.py.Method
set_default_destination(). It calls functionconstruct_SURL()to construct the prefix of ansrmpath, appends the name of the database user to the path, and assigns it to thedestinationfield of theGridProtocolclass. It also assigns thesrm_versionfield of the class, which holds the default srm version used for putting files to Grid storage.
construct_SURL() and some other functions also reside in file
GridProtocol.py, but are not methods of the GridProtocol class.
These functions are used to retrieve information needed to construct the
prefix of an srm path. Here is the list of functions:
get_availableSEhost()- It returns a list of available Storage Elements for the VO defined
in the configuration file. This is achieved by calling function
ldapsearch()from ldapsearch.py. select_SEhost()- It selects a SE randomly from the list of available Storage Elements.
get_storageElement()- It checks the available Storage Elements available for the given VO. If a user has defined a SE in the environment variable, and the SE is in the available SE list, then this SE is returned. Otherwise, a SE is selected randomly.
get_serviceEndpoint()- It returns a list of service endpoints defined for the given Storage Element.
get_port_and_srm()- It uses the service endpoints to search for the srm version and its corresponding port number for a given SE.
get_SApath()- Given the SE and VO, there is a pre-defined path under which a VO member is allowed to store files. This function returns this path.
construct_SURL()- A SURL has the format of
srm://<host>:<port><GlueSAPath>/<path>. This function returns a dictionary which contains the surl and its corresponding srm version. get_search_attribute()- Given an item, e.g. PORT, there is a corresponding attribute defined in the GLUE schema. This function returns the attribute correspond to a given item.
get_SE_filter()- It constructs the search filter for a Storage Element.
get_port_filter()- It constructs the search filter for the port of a SE.
get_SAPath_filter()- It constructs the search filter for the SAPath (Storage Area path) of a SE.
class StorageFactory
- Location:
common/net/StorageFactory.py- Related_to:
- DataObject.py
The StorageFactory class has only one method delegate(). It
checks the value of the environment variable storage_engine, which
can be defined either via the awe prompt or the configuration file.
Different values can be assigned to storage_engine, for example
astro-wise or lofar.
If the value is astro-wise, the Astro-WISE Storage will be used. If
the value is lofar, the Lofar Storage will be used.
class Storage
- Location:
common/net/Storage.py
The Storage class is an abstract class, which contains two methods
retrieve() and store(). Classes that inherit from the
Storage class have to implement these two methods.
Storage engine
class LTAStorage
- Location:
lofar/net/LTAstorage.py- Related_to:
- FileObject.py, GridProtocol.py, FileProtocol.py, GPFSProtocol.py, and DataserverProtocol.py
The LTAStorage class instantiates interfaces to the different file
systems, i.e. the Grid Storage, GPFS, the local dataserver, and the
remote dataserver.
The LTAStorage class is a subclass of the Storage class,
therefore, it implements the retrieve() and store() methods.
Given a DataObject, the retrieve() method looks up the file
objects assiociated to the DataObject, select one file object from
the list, and call the get() method of the corresponding protocol to
retrieve the file.
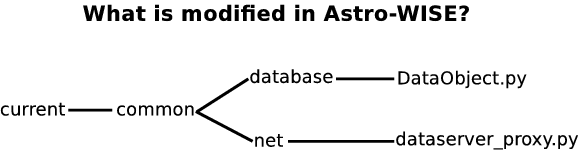
Modified classes in Astro-WISE
class DataObject
- Location:
common/database/DataObject.py- Related_to:
- StorageFactory.py and FileObject.py
The DataObject class has a storage attribute, which is assigned
by calling the delegate() method in the StorageFactory class.
Each time DataObject is instantiated, the storage used by the
instance is assigned.
The retrieve and store methods of the DataObject class call
the corresponding retrieve and store methods implemented in the
assigned Storage.
A user can choose between Astro-WISE Storage and Lofar Storage (see subsection class StorageFactory).
When Lofar Storage is used, the filename attribute of an instance of
DataObject will be an empty string, as the associated file of the
DataObject will be stored will be represented using the
FileObject class.
dataserver_proxy.py
- Location:
common/net/dataserver_proxy.py
The implementation of dataserver_proxy.py is actually not modified,
however, the usage is a bit different than before. In this file, a
Storage class is defined, which checks whether a file exists
locally. It also assigns the value of Storage to the Storage
class defined in common.net.dataserver_client.Storage.
Third-party tools
run_command.py
- Location:
common/external/run_command.py
This is not a Python interface to a third-party tool, however, it
envelops Pythons subprocess to provide a easy-to-use run method that
can be used by all the third-party tools.
jLite
- Location:
common/external/jlite.py
This is the Python interface for calling scripts from jLite, a third-party tool for generating VOMS proxy. In this interface, six methods are implemented:
proxy_init()- This method interfaces the
proxy-init.shscript of jLite. It takes the value of virtual organisation, group (if defined), and grid certificate passphrase (if given) from the environment variable. proxy_destroy()- This method interfaces the proxy-destroy.sh script of jLite. It destroys the current short-term proxy.
proxy_info()- This method interfaces the proxy-info.sh script of jLite. It is used to get the information of the current short-term proxy.
proxy_info_parser()- This method also interfaces the
proxy-info.shscript of jLite. However, it parses the output of theproxy-info.shscript, puts the parsing result into a dictionary, and returns it. proxy_time_left()- This method calls
proxy_info_parser(), and reads the time left of the proxy from the dictionary returned by theproxy_info_parser()method. proxy_VO()- This method calls
proxy_info_parser(), and extract the VO of the proxy from the dictionary returned by theproxy_info_parser()method.
dcache_srmclient
- Location:
common/external/dcache_srmclient.py
This is the Python interface for calling scripts from d-cache srmclient. Five methods are implemented in this interface:
srmcp()- This method interfaces the
srmcpscript of dcache-srmclient. It can be used to store or retrieve files from the grid storage. srmls()- This method interfaces the
srmlsscript of dcache-srmclient. It lists the files and directories under a given path on the grid storage. srmls_parser()- This method also interfaces the
srmlsscript of dcache-srmclient. However, it parses the output of the srmls script, puts the parsing result into a dictionary, and returns it. srmmkdir()- This method interfaces the
srmmkdirscript of dcache-srmclient. It creates a new directory under a given path on the grid storage. srmrm()- This method interfaces the
srmrmscript of dcache-srmclient. It removes a file from the grid storage.
ldapsearch
- Location:
common/external/ldapsearch.py
This is the Python interface for calling ldapsearch. In this interface, two methods are implemented:
ldapsearch()- This method interfaces the
ldapsearchcommand, and returns the results starting with the definedsearch attribute. ldapsearch_grep()- This method also interfaces the
ldapsearchcommand, however, it returns the results that match the givenkeywords.
myproxy
- Location:
common/external/myproxy.py
This is the Python interface for calling myproxy command-line tool. In this interfae, five methods are implemented:
myproxy()- This method interfaces the
myproxycommand. It requires one argument and passes the argument to themyproxycommand. myproxy_upload()- This method calls
myproxy()using'upload'as argument. myproxy_retrieve()- This method calls
myproxy()using'retrieve'as argument. myproxy_info()- This method calls
myproxy()using'info'as argument. myproxy_version()- This method interfaces the
myproxycommand with'version'as argument.
Lofar as an Example
LTA Storage
The LTAStorage class inherits the Storage class, both of which
are new in the Astro-WISE system. In order to use , the value of in the
environment need to be set to . The Storage class is an abstract
class, it only provides two methods store() and retrieve() that
should be implemented by classes that inherit it. The LTAStorage
class has four protocol interfaces, each of which refers to a different
type of storage. These four interfaces are:
- File Protocol (
file://), which refers to the local file system. - Dataserver Protocol (
http://), which refers to the local and remote dataservers that is accessed using the http protocol. - Grid Protocol (
srm://), which refers to the Grid storage that is accessed using the srm protocol. - GPFS Protocol (
gpfs://)
Each interface implements two methods get() and put() to perform
the actual retrieve and store actions from/to the corresponding storage
system. The FileProtocol interface checks whether the file exists on
the local file system. The DataserverProtocol interface uses the
original Astro-WISE storage methods. The GridProtocol interface is
implemented with the help of third-party tools, i.e. jLite, dcache_srmclient,
and ldapsearch (see subsection Third-party tools). The
GPFSProtocol interface is not yet implemented at the moment.
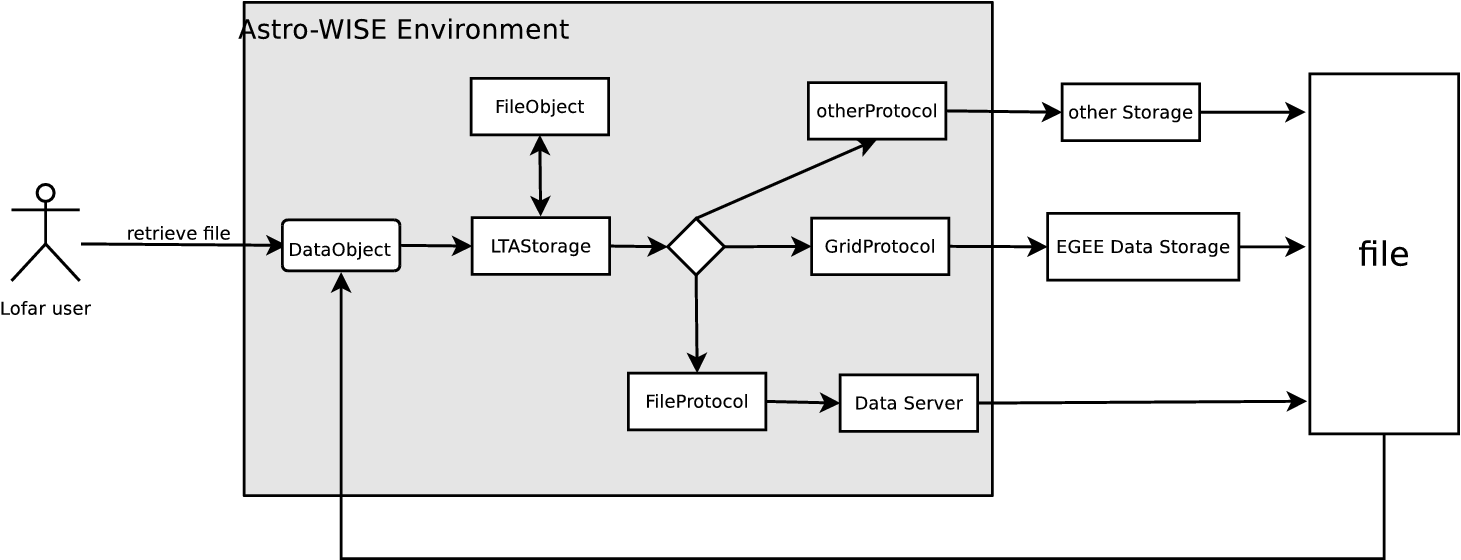
Retrieving files using LTA Storage
Figure Lofar users retrieve files using LTA Storage shows how a Lofar user retrieves a file
from the EGEE Data Storage via Astro-WISE. For example, the user wants to
retrieve a file associated with DataObject data_obj. He/she can use the
retrieve method from the DataObject class to retrieve the file, i.e.
data_obj.retrieve(). The DataObject retrieve method in turn calls the
corresponding retrieve method from a storage, in this case, the
LTAStorage. As described above, the LTAStorage has its own logic to
retrieve a file. It searches the FileObject table, and obtains a list of
fileobjects which are associated with DataObject data_obj. It returns the
urls of these fileobjects. Based on certain criteria, one of the urls is
selected. The fileobject associated with the url is retrieved using the
corresponding protocol, in this case, the GridProtocol. The retrieved file
is then returned to the DataObject.
Lofar users retrieve files using LTA Storage
Appendix A
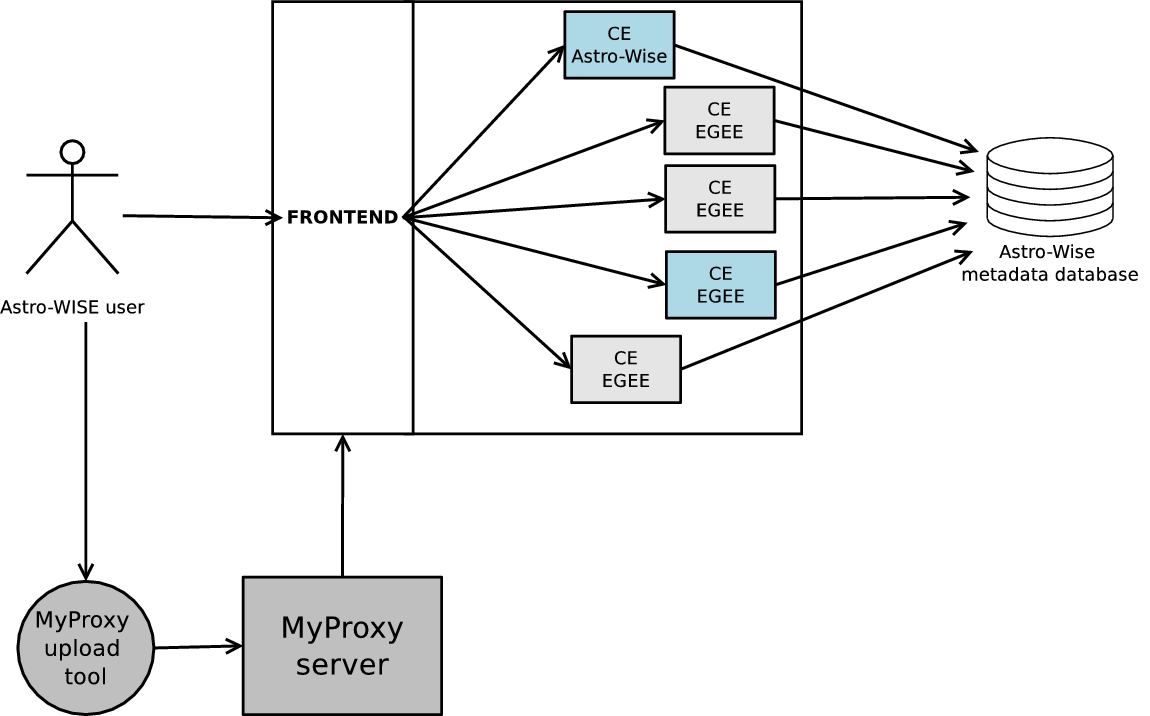
Proxy Flow Diagram
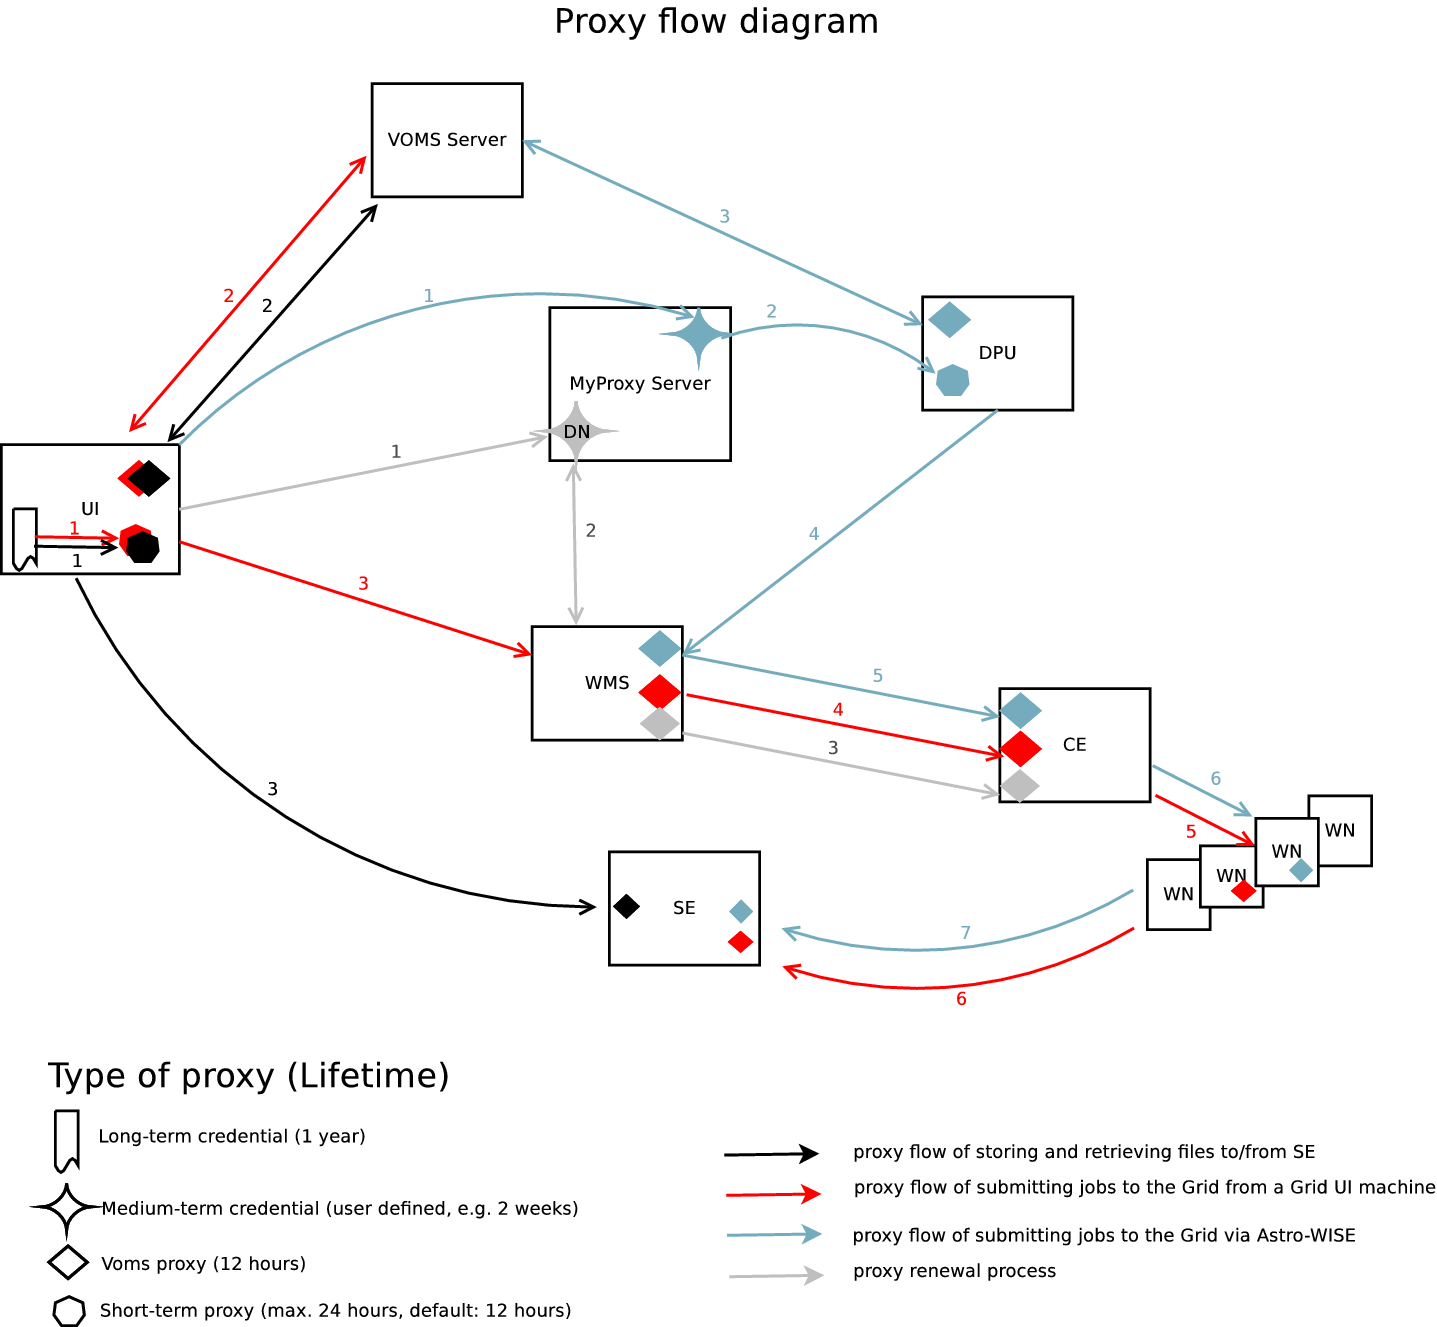
The proxy-flow diagram (Figure Proxy flow diagram) shows how proxies are involved in the different systems of job submission to the EGEE Grid, as well as communicating with the Grid storage. Each case is shown with a sequence of colored lines, where the numbers associated with the lines indicate the steps in the sequence. It is assumed that users already have a long-term credential. In the diagram, four cases are described:
- Submit jobs via a grid User Interface (UI) machine where the gLite
middleware is installed (color: RED) This case shows how the proxy
flows when a user submit a job to the Grid from a grid UI machine.
First of all, a short-term proxy needs to be created, which is by
default valid for 12 hours. A VOMS proxy, the lifetime of which is
restricted by the VOMS server to 12 hours, can then be created using
this short-term proxy. These two steps can be achieved by using a
single command ‘
voms-proxy-init --voms userVO’, whereuserVOis the Virtual Organisation (VO) in which a user belongs to. When a user runs ‘voms-proxy-init’, it contacts the user VO’s VOMS server, authenticates to the server use the user’s short-term proxy, receives the VO-specific attributes, and creates a new proxy with these attributes. After a VOMS proxy is created, a user can submit jobs to the grid. When a job is submitted, the VOMS proxy is delegated to the Workload Management System (WMS), which will then be used for job scheduling, running a job on a Worker Node (WN), and communicating with the Storage Element. - Proxy renewal for long-run jobs (color: GREY) The proxy created as described in the first case poses a problem: If a job does not finish before the expiration time of the proxy, it is aborted. To overcome this problem, a proxy credential repository system is used. It allows users to create a medium-term credential using the Distinguished Name (DN) and store it in a delegated server (MyProxy Server). The WMS can then use this medium-term credential to periodically renew the proxy for a sumitted job.
- Job submission via Astro-WISE Distributed Processing Unit (DPU) (color: BLUE) Job submission to the grid via the Astro-WISE system is handled by the grid DPU. Before any job is submitted, a user needs to create and upload a medium-term credential to the MyProxy Server. The DPU will then be able to fetch a short-term proxy from the MyProxy Server. The short-term proxy will in turn be used to create a VOMS proxy. This VOMS proxy will be used by the DPU for job submission.
- Store and retrieve files to/from grid Storage Element (SE) via Astro-WISE (color: BLACK) The first two steps of this case is similar to Case 1, where a short-term proxy is first created, then used to create a VOMS proxy. The VOMS proxy will be presented to the Storage Element for authentication when a user stores or retrieves files to/from the grid SE.
Proxy flow diagram
Appendix B
Job submission in Grid
Several commands can be used regarding job submission in Grid. Before
submitting jobs, users need to have a valid proxy. The command
glite-voms-proxy-init can be used to generate a voms proxy. The
output of running the command is as follows:
[zheng@ui ~]$ glite-voms-proxy-init -voms omegac
Enter GRID pass phrase:
Your identity: /O=dutchgrid/O=users/O=rug/OU=rc/CN=Zheng Zhao
Creating temporary proxy .................. Done
Contacting voms.grid.sara.nl:30020 [/O=dutchgrid/O=hosts/OU=sara.nl/CN=voms.grid.sara.nl] omegac DoneCreating proxy ................................................. Done Your proxy is valid until Sat Mar 20 02:33:22 2010
To submit a job to the Workload Management System, a text file containing Job Description Language (JDL) is used. The JDL describes the job and its requirements. Here is a simple example of a JDL file:
[zheng@ui ~]$ cat HelloWorld.jdl
Executable = /bin/echo;
Arguments = Hello World;
Requirements = RegExp(rug.nl, other.GlueCEUniqueId);
Stdoutput = message.txt;
StdError = stderror;
OutputSandbox = {message.txt,stderror};
we can use the command glite-wms-job-submit to submit a job. The
syntax of the command is:
glite-wms-job-submit <delegation-opts> [options] <jdl_file>
The output of running the command is as follows:
[zheng@ui ~]$ glite-wms-job-submit -a HelloWorld.jdl
Connecting to the service
https://wmslb2.grid.sara.nl:7443/glite_wms_wmproxy_server
============ glite-wms-job-submit Success ==============
The job has been successfully submitted to the WMProxy
Your job identifier is:
https://wmslb2.grid.sara.nl:9000/4EwkSBHH4nbashKxPGZdgw
============================================
The job identifier above can then be used to query the status of the
job, retrieve job output, or cancel the job. To query the status of the
job, we can use command glite-wms-job-status. The syntax of the
command is:
glite-wms-job-status [options] <job Id(s)>
The output of running the command is as follows:
[zheng@ui ~]$ glite-wms-job-statushttps://wmslb2.grid.sara.nl:9000/4EwkSBHH4nbashKxPGZdgw============== glite-wms-job-status Success ============
BOOKKEEPING INFORMATION:
Status info for the Job :
https://wmslb2.grid.sara.nl:9000/4EwkSBHH4nbashKxPGZdgw
Current Status: Done (Success)
Logged Reason(s):
-
- Job terminated successfully
Exit code: 0
Status Reason: Job terminated successfully
Destination: ce.grid.rug.nl:2119/jobmanager-pbs-short
Submitted: Fri Mar 19 14:38:24 2010 CET
============================================
From the output, we can see that the job is terminated successfully. To
retrieve the job output, we can use command glite-wms-job-output.
The syntax of the command is:
glite-wms-job-output [options] <job Id(s)>
The output of running the command is as follows:
[zheng@ui ~]$ glite-wms-job-outputhttps://wmslb2.grid.sara.nl:9000/4EwkSBHH4nbashKxPGZdgwConnecting to the service
https://wmslb2.grid.sara.nl:7443/glite_wms_wmproxy_server
=============================================
JOB GET OUTPUT OUTCOME
Output sandbox files for the job:
https://wmslb2.grid.sara.nl:9000/4EwkSBHH4nbashKxPGZdgw
have been successfully retrieved and stored in the directory:
/tmp/jobOutput/zheng_4EwkSBHH4nbashKxPGZdgw
=================================================================
To cancel a submitted job, we can use command glite-wms-job-cancel.
The syntax of the command is:
glite-wms-job-cancel [options] <job Id(s)>
Here is an example of the output of running the command:
[zheng@ui ~]$ glite-wms-job-cancelhttps://wmslb2.grid.sara.nl:9000/bbcfisneA_GVfYxaQgOkZwAre you sure you want to remove specified job(s) [y/n]y : y
Connecting to the service
https://wmslb2.grid.sara.nl:7443/glite_wms_wmproxy_server
========= glite-wms-job-cancel Success =========
The cancellation request has been successfully submitted for the following job(s):
- https://wmslb2.grid.sara.nl:9000/bbcfisneA_GVfYxaQgOkZw
================================================
Appendix C
srm commands
SRM client srmcp can be used to optimize the retrieval or storage of
files to or from Mass Storage Systems (MSS) that implement SRM. The
usage of srmcp is
srmcp [command line options] source(s) destination
where source(s) and destination are of the format
srm://host:port/path
Besides srmcp, other commands such as srmls, srmmkdir,
srmrm are also available.
srmls is a file listing command which is only available in SRM v2.2.
The usage of srmls is
srmls [command line options] destination
srmmkdir is used to create a new directory in case the directory
where a user wants to store files doesn’t exist yet. The usage of
srmmkdir is
srmmkdir [command line options] destination
srmrm is used to remove files from the storage. The usage of
srmrm is
srmrm [command line options] destination
ldapsearch
The BDII (Berkley Database Information Index) has been adopted in the
gLite middleware as the Information System technology. The protocol used
to query the information system (BDII) is LDAP, an open standard. The
source(s) and destination used in srmcp can be constructed by
searching the BDII using ldapsearch command.
For a specific VO, there is a list of Storage Elements (hosts) available which can be used to store files of the users of this VO. Each host has a corresponding port number and srm version used.
Here are some examples of how to use ldapsearch to search for information from the information system. In these examples we assume that a user’s VO is ‘omegac’.
Storage elements
To search for the Storage Elements available for this VO, we can use command:
ldapsearch -x -h bdii.grid.sara.nl -p 2170 -b mds-vo-name=local,o=grid '(|(GlueSAAccessControlBaseRule=omegac)(GlueSAAccessControlBaseRule=VO:omegac)(GlueSAAccessControlBaseRule=VOMS:/omegac/*))'| grep 'GlueChunkKey: GlueSEUniqueID='The result of this query is as follows:
GlueChunkKey: GlueSEUniqueID=se.grid.rug.nl
GlueChunkKey: GlueSEUniqueID=srm.grid.sara.nl
GlueChunkKey: GlueSEUniqueID=srm.grid.rug.nl
To get a list of storage elements which can be used easily for later
use, some post-processing on the result list has to be done. Assume we
want to store files on storage element srm.grid.sara.nl. To
construct an srm path, information such as port number and SAPath
(Storage Area Path) is also needed. As the different SRM versions
support different commands, e.g. srmls is only suppported by SRM
v2.2, it is also import to know which SRM version is used to store and
retrieve files.
Port number and SRM version
To search for the port number and the corresponding srm version, we can use the following command:
ldapsearch -x -h bdii.grid.sara.nl -p 2170 -b mds-vo-name=local,o=grid| grep srm.grid.sara.nl | grep GlueServiceEndpointThe result of this query is:
GlueServiceEndpoint: httpg://srm.grid.sara.nl:8443/srm/managerv1
GlueServiceEndpoint: httpg://srm.grid.sara.nl:8443/srm/managerv2
We can see from the result that the port used by srm.grid.sara.nl is
8443 for both SRM v1 and v2.
SAPath
To search for the SAPath of the SE, we can use command:
ldapsearch -x -h bdii.grid.sara.nl -p 2170 -b mds-vo-name=local,o=grid '(&(GlueSALocalID=omegac)(GlueChunkKey=GlueSEUniqueID=srm.grid.sara.nl))'GlueSAPath | grep GlueSAPathThe result of this query is:
# requesting: GlueSAPath
GlueSAPath: /pnfs/grid.sara.nl/data/omegac
Now we have the information we need to construct an srm path, it is:
srm://srm.grid.sara.nl:8443/pnfs/grid.sara.nl/data/omegac/UserDefinedPath
where UserDefinedPath can be any directory or filename a user wants
to use.
| [1] | http://www.astro-wise.org |
| [2] | http://www.eu-egee.org |
| [3] | http://www.ngs.ac.uk/tools/certwizard |
| [4] | http://code.google.com/p/jlite/ |
| [5] | http://www.ngs.ac.uk/ |
| [6] | http://glite.web.cern.ch/glite/ |
| [7] | http://glite.web.cern.ch/glite/wms/ |
